The best niches / keywords for Adsense

Not all niches pay the same in Adsense, and the reason is simple. If advertisers are willing to pay more per click, that means they expect to make more money per click/visitor.

Here is a list of some of the best paying niches:

  • Insurance
  • Mortgages
  • Health
  • Tecnhology
  • Donation based blogs
  • Forex / trading

So that you get an idea, this is the estimated CPC that the Adwords Keyword Planner reports for some keywords (in USA):

  • mesothelioma cancer attorney: $378,62
  • cheap vehicle insurance quotes: $217,17
  • hard disk drive data recovery: $130,29
  • donate car CA: $115,55
  • home refinance: $58,33

Compare that to:

  • tattoo ideas: $0,68
  • electric rc planes: $0,40
  • scrapbooking warehouse: $0,17
  • France info: 0,07

See the difference? And you can probably guess why a mesothelioma attorney might want to spend a high amount of money in adquiring a customer, whereas someone with tattoo ideas would be much lower, right?

Now, does this mean you should only go for the highest paying keywords? Absolutely NOT!

Sure, if you could rank in Google for mesothelioma lawyer, or home refinance, that would be awesome, but the chances are really low (or, in any case, it would take you years of hard work).

My personal advice is to go for keywords that are easier to rank. Regarding payout, my rule of thumb is to go for keywords that pay for over $1 per click. Or, to be more precise, where Google says “suggested bid” over $1.

4 reasons why you won’t make that amount per click

  1. The prices Google shows are for the search network (the ads that appear when you search on Google), not for the display network (your Adsense site)
  2. Those are suggested bid prices, but it’s not set in stone; since Adsense/Adwords works on a bidding mode, you might end up with less
  3. The traffic might vary per country (the prices I showed above are for USA traffic)
  4. Out of every click, Google keeps 32% and you get 68%

Hope that helped!


What is CTR, how to increase it, and why is it important for you?

Click Through Rate (or CTR) is one these things you have to keep checking, like the oil in your car.

What is CTR?

In a nutshell, if your ad unit is displayed 100 times, and visitors click on it 5 times, your CTR is 5%.

If you want to get a bit techie, here is the formula:

CTR = Number of clicks / Num ad impressions x 100

The higher the CTR, the more clicks you get, the more money you should make, so we aim at getting as high CTR as possible (without going overboard; otherwise Google would think there is something “fishy” going on with your site).

So how do we increase CTR?

Here are some tips:

Ad position

If your ad is at the top of the page, very visible, it will probably get more clicks than the ad at the very bottom.

Ad sizes

Some sizes perform better than others (usually the standard sizes win, but sometimes it needs some testing)

Colors

You will find people saying 2 completely different things:

  • Make your ad blend with your content (ie, use similar colors)
  • Make your ad stand out

So, there is no universal answer, aside from: test!

Use responsive ads

Nowadays lots of people browse the web using their smartphone (or tablet), so you want to use a responsive ad so it will look good in a phone.

Your theme (if using WordPress)

Although content is more important in this case, some themes are better for ads than others

Have high quality content

If your content is good, it will keep people reading your site (instead of leaving after 5 seconds), so you have a higher chance of getting your ad clickd

Keep some space between your content and ads (so that these stand out)

Experiment

My final advice is this: test, test, test. Maybe what works for others does not work for you. Or what works for you in one site works differently in another…

How to insert Google Adsense Ads in your website

So, by now you probably have an active Adsense account (if not, read my tips to get your Adsense account approved).

The next steps are:

  • Generate one or more ad units
  • Insert them into your blog / website

I’m assuming you are using WordPress, so here are my recommended plugins:

Quick Adsense (link)

I have been using this plugin for years (simple yet powerful), but it is now discontinued and hasn’t had an update in over 4 years, so my number #1 choice now is…

Adsense Plugin WP QUADS (link)

The author took the code from Quick Adsense and improved it, so it’s newer/better. This is the one I use right now.

The Official Google Adsense plugin – by Google (link)

The description reads things like “Easily add Adsense ads” – “Manage your ads quickly”. However, I’ve found that for my taste, any of the previous plugins work better for me. It has 200k installs though, so it must be doing something properly 😉

Bonus: Google Adsense Dashboard (link)

Use this plugin to see your Adsense earnings right inside WordPress

How to insert Adsense Ads:

For this, we will be using WP QUADS.

Step 1: Create an ad inside Adsense (You can pick any size you want, but I recommend using a responsive unit)

Step 2: Install and activate the WP QUADS Plugin

Step 3: Go to WP QUADS

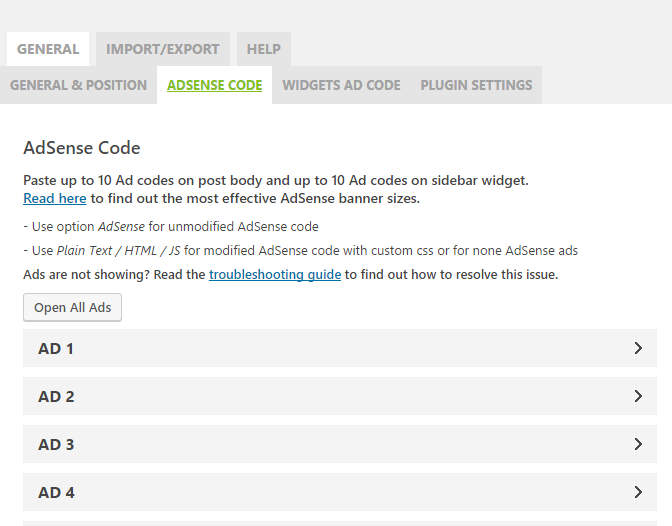
Under ADSENSE CODE, you can enter up to 10 Ad codes; however usually you won’t need more than 1 to 3 ad codes.

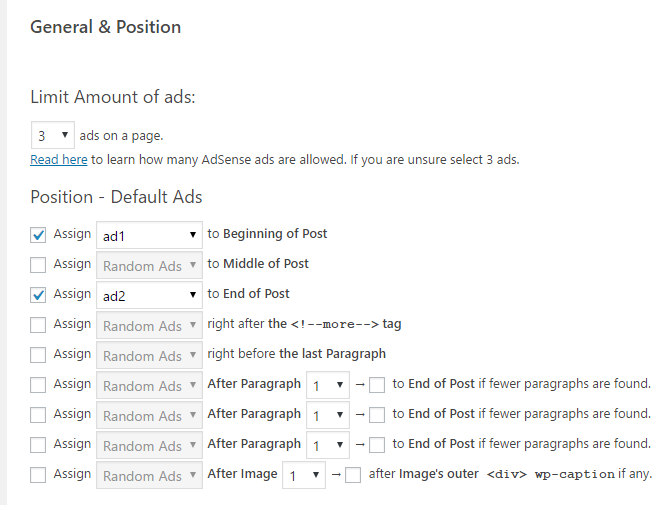
Step 4: Once you have entered the code, go to “GENERAL & POSITION“, and select where you want your ads to appear. In my example, I’m adding a square ad block (ad1) at the beginning of the post, and a horizontal ad (ad2) at the end of the post.

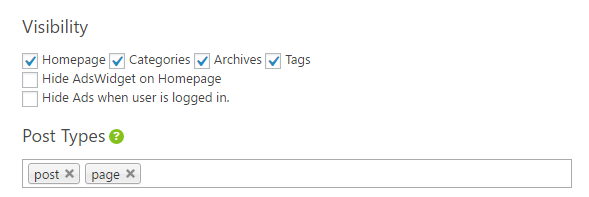
Step 5: Choose if you would like the ads to appear in places like Homepage, category page, etc.

Step 6: Make sure to select “Limit Amount of ads” to 3, since if you add more, you will be breaking Google Adsense’s policy.

That’s it! Now you have ads on your website ready to make you money.

Recommended positions

In my experience, the ads that work best are:

Beginning of Post: this is the very first thing your visitor will see, so it’s good to have an add here

End of Post: After they have read your post, they might want to know more, and here is your ad, ready to make you $$$ when they click.

Sidebar: It’s handy to have an ad ready in your sidebar (to add it, go to Appearance > Widgets, and drag and drop one of the widgets called AdsWidgetX (Quick Adsense Reloaded)


So that’s it!


Some tips to get your Google Adsense Account approved quickly

If you don’t have an Adsense account, the first step is to request approval.

Make sure to follow these tips (all of them) to make sure you get approved.

(I’ve read somewhere that Adsense accepts only 3 accounts out of every applications, so you definitely want to be one of those 3).

By the way, there is no telling how long your application will take to be reviewed, but the norm is around 3 days.

So let’s dive into the things you should do:

Content

  • Have a reasonable amount of content (ideally a minimum of 15 posts)
  • The content must be unique / high quality. Aim for a minimum of 500-600 words per post
  • Don’t use copyrighted images
  • Make sure to have these pages created:
    • About
    • Contact (if possible put your name and address)
    • Privacy Policy
    • Disclaimer
    • Terms and Conditions
  • Your site must be in one of these languages


Design

Use a nice looking design

Make sure your theme is reponsive (ie, looks good on a mobile device)


Domain

Apply using your root domain (not a subdomain)

Ideally, you want your domain to be a bit old (in some countries, like India and China, they require it to be at least 6 months old, but something like 1-2 months should be fine)


Niche

Adsense has a strict policy when it comes to the niche/thematic of your site. These are some of the content types not allowed by Adsense:

  • Pornography/Adult materials
  • Pirated Content
  • Hacking or Cracking Tutorials
  • Illegal Drugs/Paraphernalia
  • Any Other Illegal Stuff


Other ads / monetization

When applying for Adsense, make sure your site does not have any kind of ads (you can add them later on, once you get approved, as long as it does not break the Adsense TOS)


Other ideas

You must be 18+ to apply for the program

Make sure your traffic comes from reputable sources (SEO/organic traffic being the best one).

Getting started with Google Adsense

Last week I talked about the 3 ways to make money online (ok, 3 of them)

This week we will focus on Google Adsense, which is one of the easiest ways to make your first $1 online.

This is what you will need:

  1. A Website
  2. An Adsense account

That’s it! Once you have both, you can place the Adsense ad code in your site and your visitors will automatically start seeing ads.

Bear in mind that in order to apply for an Adsense account, you need to show them the url of your website, so you need to have one created beforehand. I recommend you have some unique articles (not just scraped content). A website with only one page probably won’t work. You want to get accepted the very first time, so make sure to put some work (and love) into it.

How does Google Adsense work?

It’s very simple, you just place a few lines of code in your website, and Google will show ads related to your site’s content.

Every time a visitor clicks on one of your ads, you will get a %of the money Google makes with that click (to be precise, you get 68%).

Not all clicks are worth the same, so a click can range from 1 cent up to 1-2 dollars.

There are several factors that affect CPC (cost per click), I will be talking about those in future articles.

They have both text and image ads. You can select just one of them, or let Google show both. I recommend having both (for advanced users, you can test and pick text ads only if they make you more money on your site).

Assuming you have a WordPress site, the best option is to use a plugin to insert ads. I will describe the whole process in detail in upcoming articles.

So that’s it for today! If you don’t have an Adsense account, make your site look nice, add some useful unique content, and apply for an account here.

If you have an account, well done! It’s time to earn some $$$.